目录
Are you tired of dealing with noisy neighbors, or are you a sound engineer looking to ensure the perfect audio levels for your next project? Whether you’re a professional or a hobbyist, having a reliable decibel detector, also known as a sound level meter, is essential for accurately measuring and monitoring sound levels. in this article, we’ll guide you through the process of setting up, calibrating, and using a decibel detector to ensure precise and consistent results.
Setting Up Decibel Detector
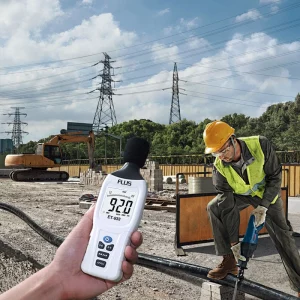
Before diving into the technical aspects of using a decibel detector, it’s crucial to ensure that you have the right equipment for the job. when selecting a sound level meter, consider factors such as the measurement range, accuracy, and additional features like data logging and frequency weighting. once you have chosen the right decibel detector for your needs, it’s time to set it up for use. so we recommend the ET-933 product, which comes from Shenzhen FLUS Technology Co., ltd.
Please Follow The Operating Instructions Operation Instruction
(1) Power ON/OFF: Turn the meter on by pressing “![]() ” button for 1 second. Turn the meter off by pressing and holding “
” button for 1 second. Turn the meter off by pressing and holding “![]() ” button for approx. 3 seconds then lose the button.
” button for approx. 3 seconds then lose the button.
(2) Backlight after turning the meter on, momentarily press “![]() ” key, the backlight will be on/off, and it will automatically turn off after approx. 30 seconds of inactivity.
” key, the backlight will be on/off, and it will automatically turn off after approx. 30 seconds of inactivity.
(3) Frequency weighting A/C Selection press “![]() ” key to select A or C. dBA: A frequency weighting(the noise that the human ear can hear)dBC: C frequency weighting (response to machine monitor)
” key to select A or C. dBA: A frequency weighting(the noise that the human ear can hear)dBC: C frequency weighting (response to machine monitor)
(4) FAST/SLOW Selection after powering the meter on, press “![]() ” to select FAST or SLOW measurement.
” to select FAST or SLOW measurement.
FAST: Fast sampling time measurement,1 time per 125ms.
SLOW: Slow sampling time measurement, 1 time per second.
(5) MAX/MIN:
After powering the meter on, keep pressing the “![]() ” key for three seconds to enter the MAX measurement, ‘MAX’ will appear on the LCD, and the captured maximum sound level will be displayed on the LCD. Press the key again, ‘MIN’ will appear on the LCD and the minimum sound level will be displayed on the LCD. Keep pressing the button for three seconds to exit MAX/MIN measurement mode.
” key for three seconds to enter the MAX measurement, ‘MAX’ will appear on the LCD, and the captured maximum sound level will be displayed on the LCD. Press the key again, ‘MIN’ will appear on the LCD and the minimum sound level will be displayed on the LCD. Keep pressing the button for three seconds to exit MAX/MIN measurement mode.
(6) Data HOLD:
After turning the meter on, momentarily press “![]() ” button, “HOLD” icon will appear on the LCD, which indicates the data is frozen. To release the held reading, press the button again.
” button, “HOLD” icon will appear on the LCD, which indicates the data is frozen. To release the held reading, press the button again.
(7) Level Range Selection:
press “![]() ” key, the level range will change from ‘Lo’, ‘Med’, ‘Hi’ to ‘Auto’ level in the circular.
” key, the level range will change from ‘Lo’, ‘Med’, ‘Hi’ to ‘Auto’ level in the circular.
Lo:30dB~80dB Med:50dB~100dB
Hi:80dB~130dB Auto:30dB~130dB
Before powering on the meter, press “![]() ” key first, then press “
” key first, then press “![]() ” to disable the auto power-off function. Power off the meter, then power on to enable the auto power-off function.
” to disable the auto power-off function. Power off the meter, then power on to enable the auto power-off function.
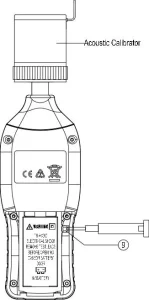
Calibration Procedure
(1) Make the following switch settings:
Frequency weighting: A-weighting
Time weighting: FAST Level range: 50 ~100dB
(2) Insert the microphone housing carefully into the 1/2 inch insertion hole of the calibrator(94dB @ 1kHZ).
(3) Turn on the switch of the calibrator and adjust the CALL potentiometer until 94.0dB is displayed.
In conclusion, this sound level meter is designed to meet the measurement requirements of safety engineers, health, industrial safety offices, and sound quality control in various environments like factories, schools, construction, etc, Welcome everyone to purchase the decibel detector.
0